The Troll's factory

Geekeries & pensées
-->

Google Docs : les alineas // paragraph first line indent

English readers: See English version at the bottom of the French one


Si vous cherchez sur Internet comment faire automatiquement des alineas dans Google Docs pour tous vos paragraphes, vous allez sûrement trouver plein de ressources qui vous disent d’aller éditer du CSS etc. … Non seulement la plupart des gens ne vont pas comprendre grand chose à ce qu’il sont en train de faire, mais en plus personnellement je n’ai jamais trouvé cette option !

Alors voici une vraie méthode qui marche et qui est simple :

Mettez le curseur sur un de vos paragraphe (le curseur d’écriture, pas juste votre pointeur)

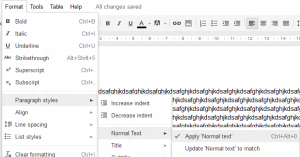
Appliquer le style « Normal » à votre parapraphe en faisant : Format > Style de paragraphe > Normal > Appliquer le style

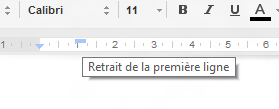
Ensuite, déplacez la petite barre bleu horizontale en haut de la règle vers la droite de la largeur de l’alinea que vous voulez (1cm par exemple):

Enfin, retournez dans les style de paragraphe mais cette fois choisissez « Mettre à jour », comme ceci : Format > Style de paragraphe > Normal > « Mettre à jour le texte Normal en fonction de »

Et hop ! Tous les paragraphes qui ont ce style auront dorénavant un alinea !


————————– English version ————————–


If you look on the Internet how to automatically have indentation on the first line of a paragraph in Google Docs, you will certainly find a lot of resources telling you to edit some CSS etc. … Not only most of the people will not understand what they are doing by doing that but I also never found this option, personally !

So here is a way to do it that works and is simple:

Place the cursor inside one of your parapraphs (the writing / keyboard cursor, not you mouse pointer!)

Apply the « Normal » paragraph style to your current paragraph by doing : Format > Paragraph styles > Normal > Apply


Them, move the small blue bar at the top of the rule to the right. Move it of how many cm you want for your indentation (1cm for instance):

Finally, go back in paragraph styles but this time choose the « Update to match » option: Format > Paragraph styles > Normal > Update Normal to match

And here you go! All your paragraph that have this style (which is the default one) will now be indented!



posté par Troll dans astuces avec 2 commentaires

Update your Samsung Galaxy S i9000 to Gingerbread (Android 2.3) through Kies 2

This is the English version of the article « Mettre à jour son Samsung Galaxy S i9000 vers Gingerbread (Android 2.3) avec Kies 2« 


When the first update of the Samsung Galaxy S (i9000) came out, I explained to you how to proceedd to get Froyo your phone even if it was not « available » for your country yet (and there was chance it would not be before a long time).

This month, Samsung finally released the Gingerbread update for SGS… But, well, one more time, it is really painful to get it, and Kies won’t let you update your French, UK, or anything, version until certainly a month, not to say two.

So one more time, there exists a method to follow word by word to update nevertheless ! As it is really hard to find it clearly explained on the Internet, I will explain it in details here.out en détails ici.

I STRONGLY ADVICE YOU TO DO A COMPLETE BACKUP BEFORE DOING SUCH MANIPULATIONS.

I won’t be, in any case, responsible for the possible damage you phone may get by doing the following manipulations (which are, though, not really risky if  you follow the procedure to the letter). You are doing them at your own risks and under your entire responsibility.

So, to update its Samsung Galaxy S i9000 to Gingerbread (Android 2.3), one follows the following directives :


  1. Download the last Kies version from the official Samsung website and CHOOSE « English » as installation language (I tested for instance with FR version and it kind of crashed… to, maybe it works with non-English version, but did not for me). If you already have Samsung Kies installed on your computer, launch it and simply accept downloading and updating to the new version. (If you already had Kies 2.x and it does not ask your for an installation language during the update, you can try with a non-English version but I don’t have any guaranty it will work).
  2. If you phone is not rooted yet, roote it by following the Android any-version root instructions (NOTE : After updating through Kies, the root will vanish, so if you don’t want your phone to be rooted, don’t be concerned about rooting it now, it won’t be rooted at the end anyway). If it is already rooted, go to the step 3.
  3. If your phone has any sort of « LagFix », UNDO IT NOW BEFORE USING SPOOFFW. If, for example you installed the « One Click LagFix » (OCLF) by RyanZa as adviced in this article about Froyo update on the Galaxy S, just relaunch the OCLF application and click « Undo LagFix ». REBOOT AFTER UNDOING THE LAGFIX. If you don’t have any lagfix, go to step 4.
  4. Install the « Spooffw » app from Android Market or from the XDA-Dev thread about Spooffw.
  5. Launch Spooffw and accept the root rights request (it is possible that it does not appear immediatly, if this is the case, accept it when it appears and resatart the application after having accepted the permanent root access for Spooffw).
  6. Push the « Menu » button on your phone to get the menu
  7. Click « Update the presets« 
  8. Then click  « Backup » button
  9. Reclick « Menu », and then « Presets« 
  10. Select « Europe » (NOT « Europe 2.1″), you should see « I9000XXJPO » for PDA and ProductCode ending with « XEU »
  11. Click « Ok ».
  12. Reboot the phone
  13. After reboot, relaunch Spooffw
  14. Choose « Menu » and « Presets » one more time and select « Europe » (NOT « Europe 2.1″), you should see respectively I9000XXJPP and I9000XAJPO.
  15. Click « Ok ».
  16. Close « Spooffw » and go home screen
  17. Connect the phone to the computer, in Samsung Kies mode.
  18. Launch Samsung Kies
  19. Samsung Kies suggests you to update to JVO version.
  20. Accept the update and follow the instructions…
  21. Here is it, your Samsung Galaxy S i9000 is now running Gingerbread !


If you found this tip useful, don’t hesitate to post a comment below, it is always pleasant to know people use your work :) You can also follow me on Twitter here to keep up to date about the last tips published on the TrollFactory.


posté par Troll dans Android,astuces,Geekeries,High-tech avec 59 commentaires